In a normal Kubernetes Deployment PODs will be typically created and continue to run. Jobs in Kubernetes are slightly differerent and are designed to run a particular task, complete their work and then exit. A Job will create a number of PODs ensuring at least one of them will successfully terminate.
Cron Jobs build on this functionality by allowing the running of Jobs within the cluster at set times. This is very similar the to normal Cron Jobs running on a standard Linux build. In this case the task will be done by running the suitable commands within containers rather then directly on the Host.
This allows the easy creation of PODs having tasks that need to run to completion no matter what. This means that if a Node goes down or a POD crashed another POD will be created to complete the task.
The use of Cron Jobs allows the scheduling of these tasks to occur at set times, taking advantage of the high availability offered by Kubernetes.
Overview of Lab
In this Lab we will create a persistentVolumeClaim, PVC, that will be mounted within a POD running a simple Busybox container. A Cron Job will be created to modify a file stored on a separate NFS storage server, adding a new line each minute with the time and date.
This is an example of a container having an impact on a file stored outside the cluster in use within another POD but the modified file could just as easy be used by something outside the cluster.
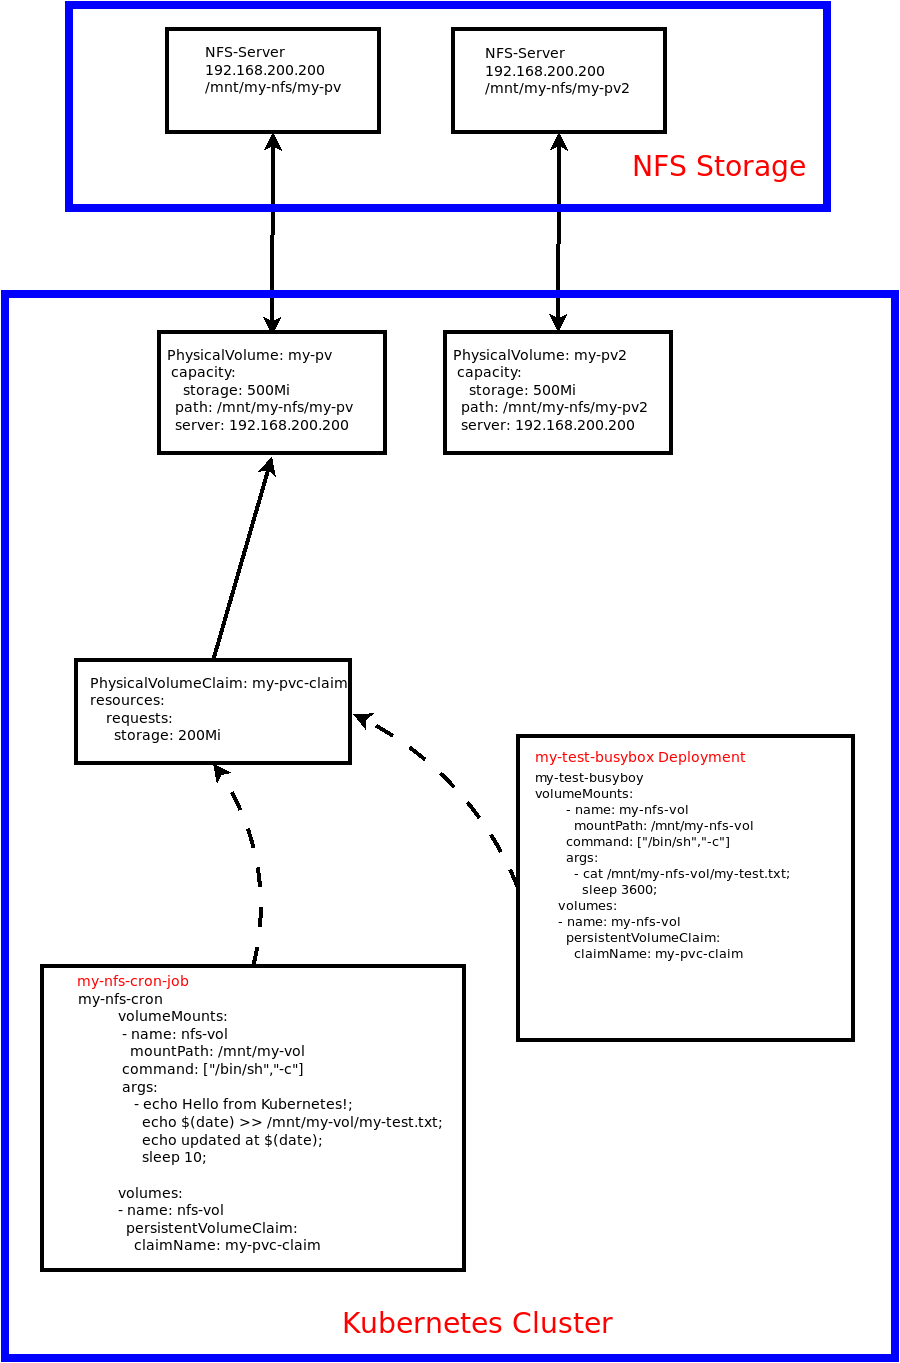
The following manifest files will be used to create the necessary Persistent Volumes (PVs).
$cat my-pv.yaml
apiVersion: v1
kind: PersistentVolume
metadata:
  name: my-pv
  namespace: test
spec:
  capacity:
    storage: 500Mi
  accessModes:
    - ReadWriteMany
  persistentVolumeReclaimPolicy: Retain
  nfs:
    path: /mnt/my-nfs/my-pv
    server: 192.168.200.200
    readOnly: false

$cat my-pv2.yaml
apiVersion: v1
kind: PersistentVolume
metadata:
  name: my-pv2
  namespace: test
spec:
  capacity:
    storage: 500Mi
  accessModes:
    - ReadWriteMany
  persistentVolumeReclaimPolicy: Retain
  nfs:
    path: /mnt/my-nfs/my-pv2
    server: 192.168.200.200
    readOnly: false
These can be created by running the following:
kubectl create -f my-pv.yaml
kubectl create -f my-pv2.yaml
We will then create a PVC to bind to one of the PVs which can then be used in the PODs that will be created.
cat my-pvc.yaml
apiVersion: v1
kind: PersistentVolumeClaim
metadata:
  name: my-pvc-claim
  namespace: test
spec:
  accessModes:
  - ReadWriteMany
  resources:
    requests:
      storage: 200Mi
The my-pvc-claim PVC will look for a suitable PV that has at least 200M of storage available and bind to it. We can see this by running some simple describe commands to verify.
vagrant@k8s-master-1:~/nfs-lab$ kubectl describe pv
Name:            my-pv
Labels:          <none>
Annotations:     pv.kubernetes.io/bound-by-controller: yes
Finalizers:      [kubernetes.io/pv-protection]
StorageClass:
Status:          Bound
Claim:           test/my-pvc-claim
Reclaim Policy:  Retain
Access Modes:    RWX
VolumeMode:      Filesystem
Capacity:        500Mi
Node Affinity:   <none>
Message:
Source:
    Type:      NFS (an NFS mount that lasts the lifetime of a pod)
    Server:    192.168.200.200
    Path:      /mnt/my-nfs/my-pv
    ReadOnly:  false
Events:        <none>


Name:            my-pv2
Labels:          <none>
Annotations:     <none>
Finalizers:      [kubernetes.io/pv-protection]
StorageClass:
Status:          Available
Claim:
Reclaim Policy:  Retain
Access Modes:    RWX
VolumeMode:      Filesystem
Capacity:        500Mi
Node Affinity:   <none>
Message:
Source:
    Type:      NFS (an NFS mount that lasts the lifetime of a pod)
    Server:    192.168.200.200
    Path:      /mnt/my-nfs/my-pv2
    ReadOnly:  false
Events:        <none>

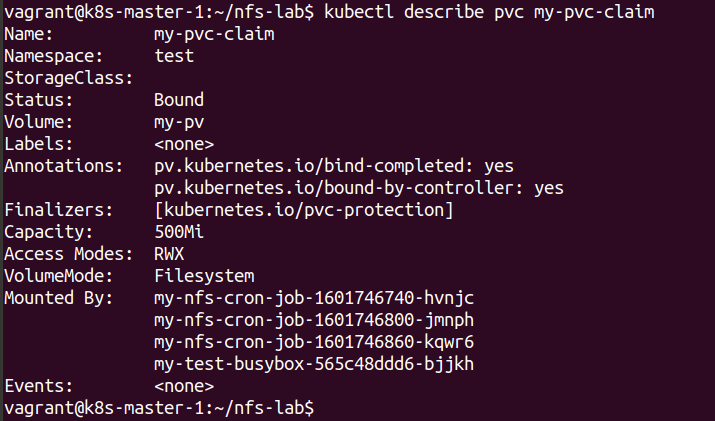
We can see that the first PV has been claimed by the my-pvc-claim PVC and the second one is still available. We can also look at the PVC as well.

Once the PV and PVCs have been created we can now create a simple Deployment of a single POD running a BusyBox container that will mount the NFS directory.
cat my-test-busybox.yaml
apiVersion: apps/v1
kind: Deployment
metadata:
  creationTimestamp: null
  labels:
    app: my-test-busybox
  name: my-test-busybox
  namespace: test
spec:
  replicas: 1
  selector:
    matchLabels:
      app: my-test-busybox
  strategy: {}
  template:
    metadata:
      creationTimestamp: null
      labels:
        app: my-test-busybox
    spec:
      containers:
      - image: busybox:1.28
        name: busybox
        volumeMounts:
        - name: my-nfs-vol
          mountPath: /mnt/my-nfs-vol
        command: ["/bin/sh","-c"]
        args:
          - cat /mnt/my-nfs-vol/my-test.txt;
            sleep 3600;
      volumes:
      - name: my-nfs-vol
        persistentVolumeClaim:
          claimName: my-pvc-claim
The container within the POD will simply send the contents of the my-test.txt file to std output within the container. This has the effect of sending it to the logs used for that POD in Kubernetes. The container will then sleep for 3600 seconds.
The Deployment is created using
kubectl create -f my-test-busybox.yaml
The success of this command can then be checked

The Cron Job that will be created is the following:
cat my-nfs-cron.yaml
apiVersion: batch/v1beta1
kind: CronJob
metadata:
  creationTimestamp: null
  name: my-nfs-cron-job
spec:
  jobTemplate:
    metadata:
      creationTimestamp: null
      name: my-nfs-cron-job
    spec:
      template:
        metadata:
          creationTimestamp: null
        spec:
          containers:
          - image: busybox
            name: my-nfs-cron-job
            volumeMounts:
            - name: nfs-vol
              mountPath: /mnt/my-vol
            command: ["/bin/sh","-c"]
            args:
              - echo Hello from Kubernetes!;
                echo $(date) >> /mnt/my-vol/my-test.txt;
                echo updated at $(date);
                sleep 10;
          volumes:
          - name: nfs-vol
            persistentVolumeClaim:
              claimName: my-pvc-claim
          restartPolicy: OnFailure
  schedule: '* * * * *'
The important sections of the manifest is the schedule section which details the times that the Job will be run and the command/arguments section. The format used here is exactly the same as a standard Linux Cron Job. In this case the Job will be run every minute.
The command section will create a suitable shell and run the commands listed under the args section. In this case the container will send some data to std output, allowing the POD logs to be checked and update a line with the current date to my-test.txt on the NFS server.
The Cron Job is created by running:
kubectl create -f my-nfs-cron.yaml
Again we can view what gets created within the namespace.
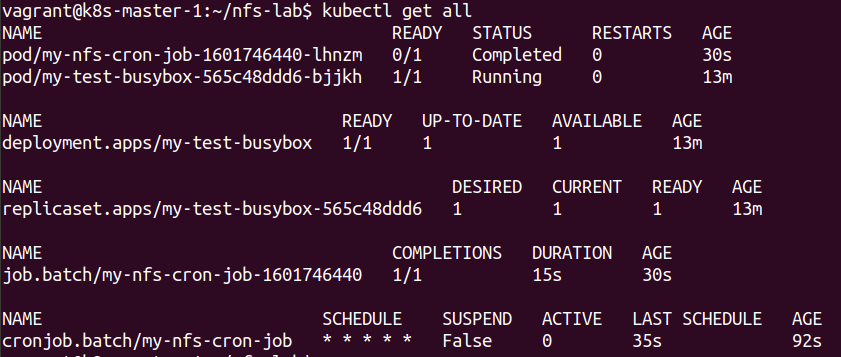
We can see the PODs being created for the job and completing as well.
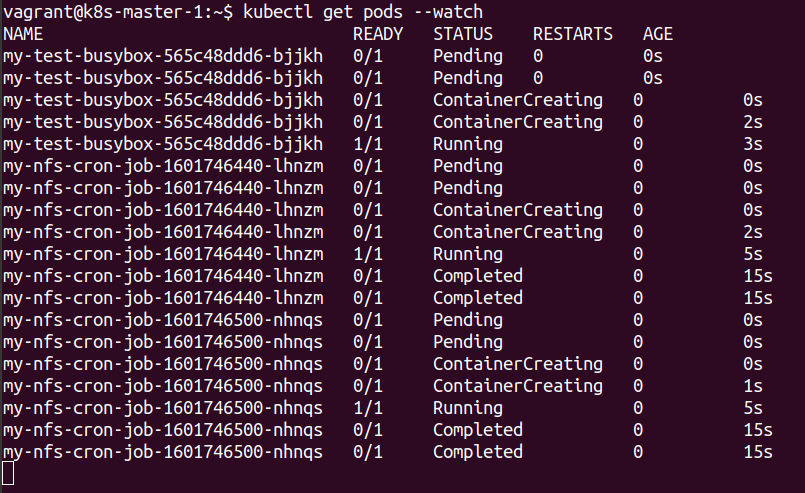
It can be seen that the PODs that created for the Job are often reported as complete as they simply run the necessary commands, sleep for 10 seconds and then complete.
The interesting thing is that Kubernetes keeps the last few PODs on the cluster rather then terminating them. This allows the logs to be checked on completed PODs associated with the Job.

The PVC is being used by both the normal Deployment and the completed PODs of the Job.
The final part of the Lab is looking at the file that is being updated by the Cron Job every minute. This can be checked by logging onto the NFS server and looking at the file.
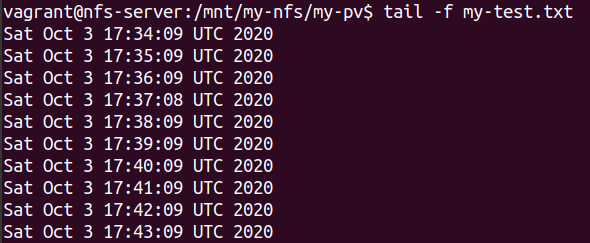
The same file can also be observed by opening a terminal session to the BusyBox container itself, which shows the same information.
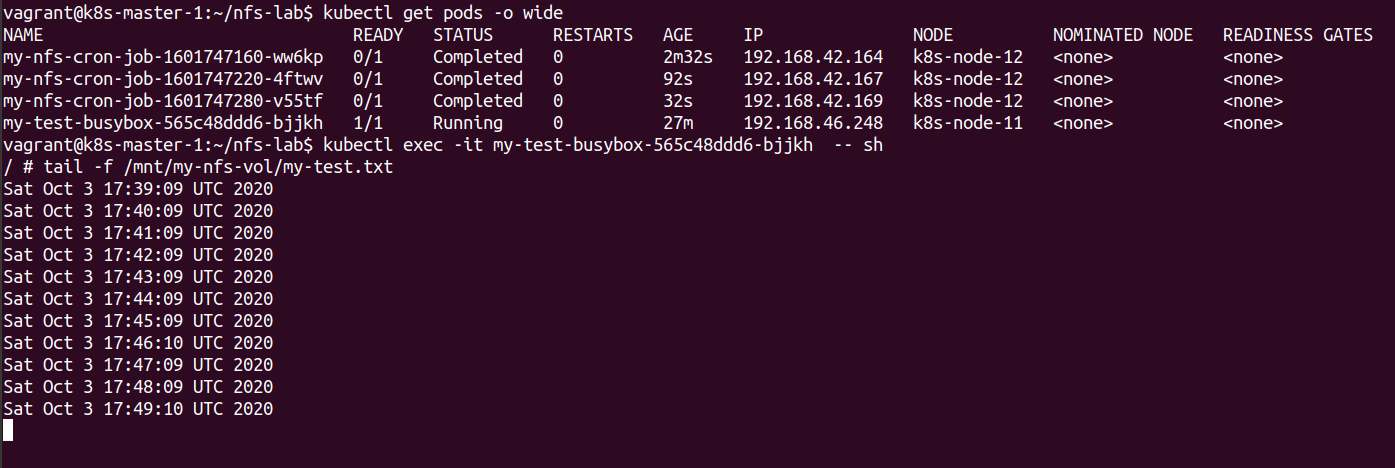
This shows the completed PODs that were created as part of the Cron Job that have been created over the Nodes within the cluster. This gives a highly resiliant way of running the Jobs.
It can be seen that the Busybox container has the same data as stored on the NFS server. This data is also being adjusted every minute by the Jobs being run on the cluster.
Conclusions
The use of Jobs within Kubernetes is a flexible way of running tasks that need to be done on either an ad-hoc basis or regularly by the use of Cron Jobs. The controller will create enough PODs to complete the Job if there is either a problem with the POD crashing or the Node it is running on.
In this Lab we made use of NFS to mount a file into a running POD and then used a Cron Job to write to the same file every minute. We were able to check that one of the PVs was bound to a PVC which was then mounted into both the Deployment and the PODs created to run the Job.
We were able to observe the PODs being created, running the Job and then being completed. The cluster will keep the last 3 PODs on the cluster allowing confirmation of logs if required. After this the PODs will be terminated in the normal way.
PODs that run in normal Deployments normally run continuously rather then running a Job and then completing.
Typical uses of Jobs can include things like performing backups or sending an alert if something has happened.