This post is a follow up to the previous one that described the use of tunnelling of an OpenVPN link to encrypt a connection from a client on the 192.168.200.0/24 network to a web server on 172.16.0.0/24 network. The original post highlighted the need to confirm the traffic was actually routed over the tunnel overlay at 10.8.0.0/24 rather then the underlying network.
In this post we will replace the OpenVPN machine with one that is running pfSense which will run OpenVPN and allow the same setup to be done in an easier way. While we will just use OpenVPN in this article pfSense is a powerful package which allows other functionality as well.
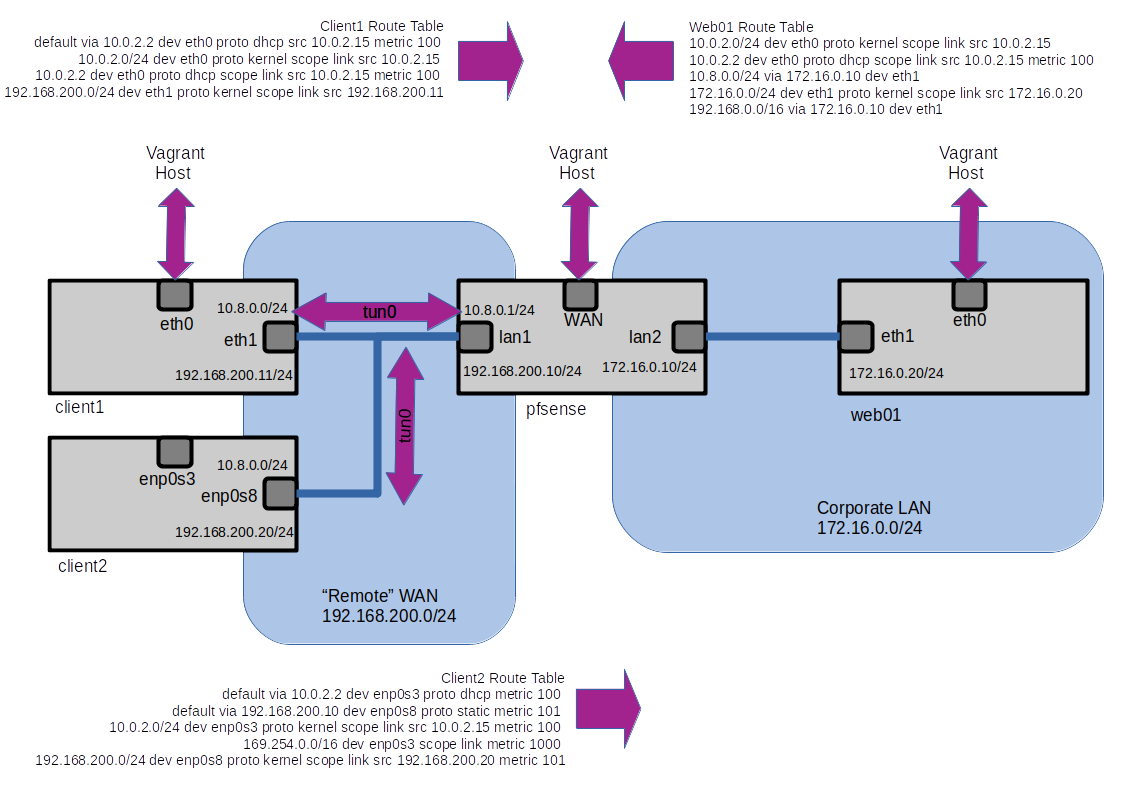
The basic setup consists of 4 Virtual Machines, each of which also has a interface that acts as a NAT interface to the Host Machine which allows remote access and internet connection.
By default all traffic between the clients and the Web server goes via the underlay network.
vagrant@client-1:~$ tracepath -n 172.16.0.20
 1?: [LOCALHOST]                      pmtu 1500
 1:  10.0.2.2                                              0.670ms
 1:  10.0.2.2                                              0.617ms
 2:  172.16.0.20                                           1.265ms reached
salterje@salterje-VirtualBox:~$ tracepath -n 172.16.0.20
 1?: [LOCALHOST]                      pmtu 1500
 1:  10.0.2.2                                              0.342ms
 1:  10.0.2.2                                              0.619ms
 2:  172.16.0.20                                           1.334ms reached
     Resume: pmtu 1500 hops 2 back 64
Both of these results mean that the clients are actually reaching the Web Server at 172.16.0.20 via the Virtualbox NAT address of 10.0.2.2, with all the guest machines having an address of 10.0.2.15
This is expected when running under VirtualBox.
Configuration of PFSense
We'll now configure PFSense to run an OpenVPN server which will push routes out to the clients, set up Firewall settings on the PFSense machine and allow the connection from the clients to the web server to be encrypted and sent over a tunnel which runs over the interfaces connected to 192.168.200.10.
Installation of openvpn-client-export
While OpenVPN is included within PFSense we will first install a plugin which will allow easy export of the necessary configuration file and TLS certificates.
This is a simple case of installing it via the package manager via the web interface.
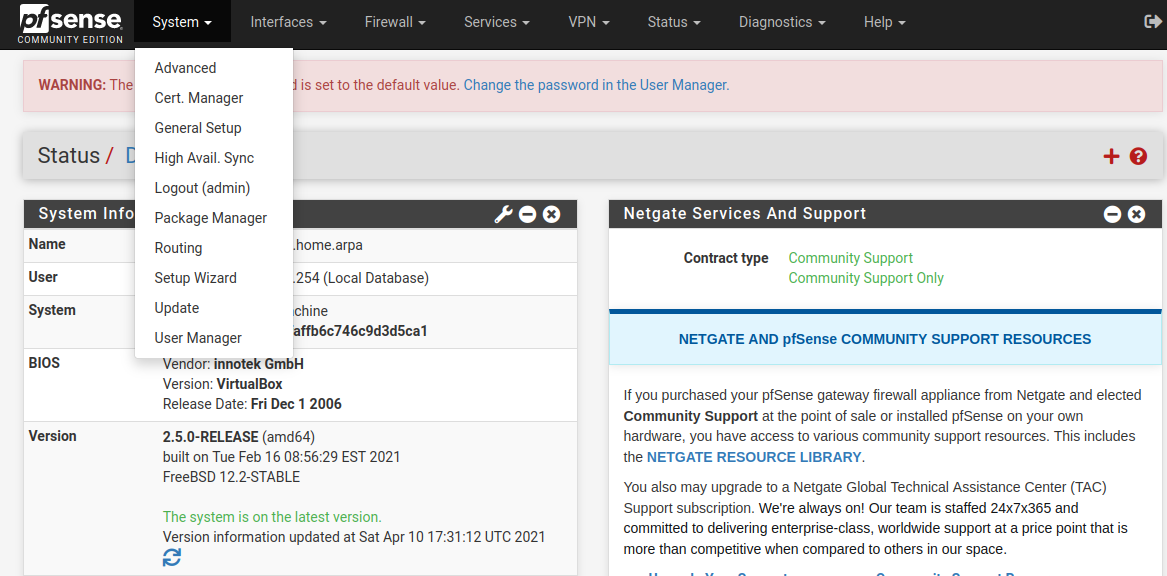
Select the appropriate plugin under available packages and click to install it.
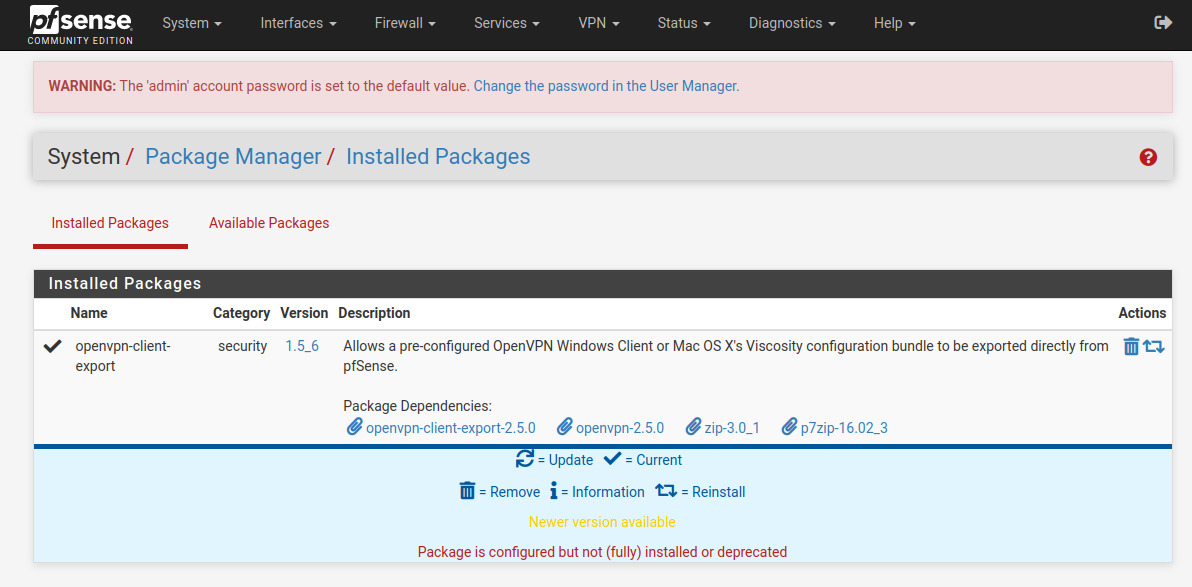
This plugin will make things much easier when we come to copy the necessary files to the clients.
Creation of OpenVPN via Wizard
PFSense offers a Wizard to setup an OpenVpn Server, including the creation of a CA and appropriate server certificate. To make things easy we will rely on a local user database running on the PFSense Machine itself, although it is possible to integrate user management with an LDAP or Radius server.
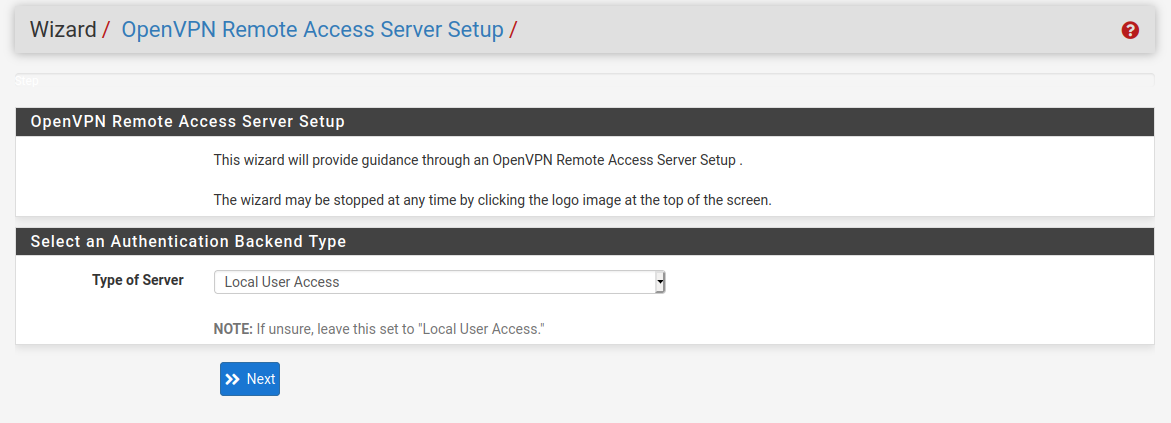
We'll create a local user installation
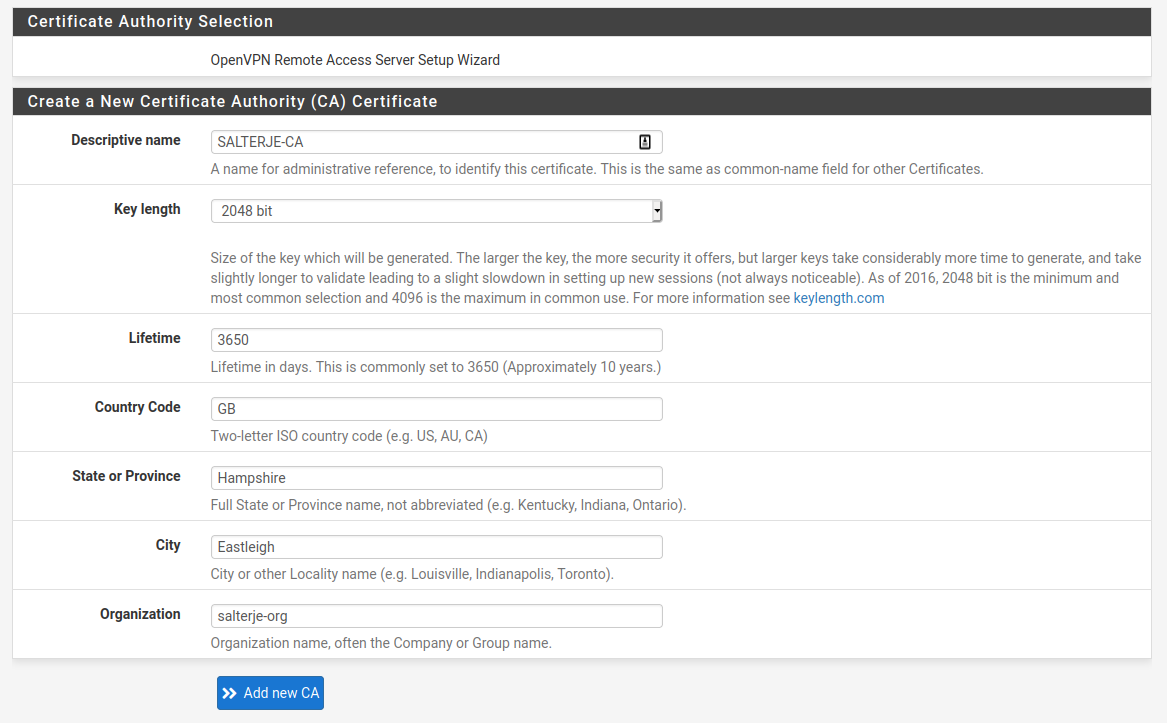
The first thing to do is the creation of a Certificate Signing Authority which will be used for creation of all necessary certificates.
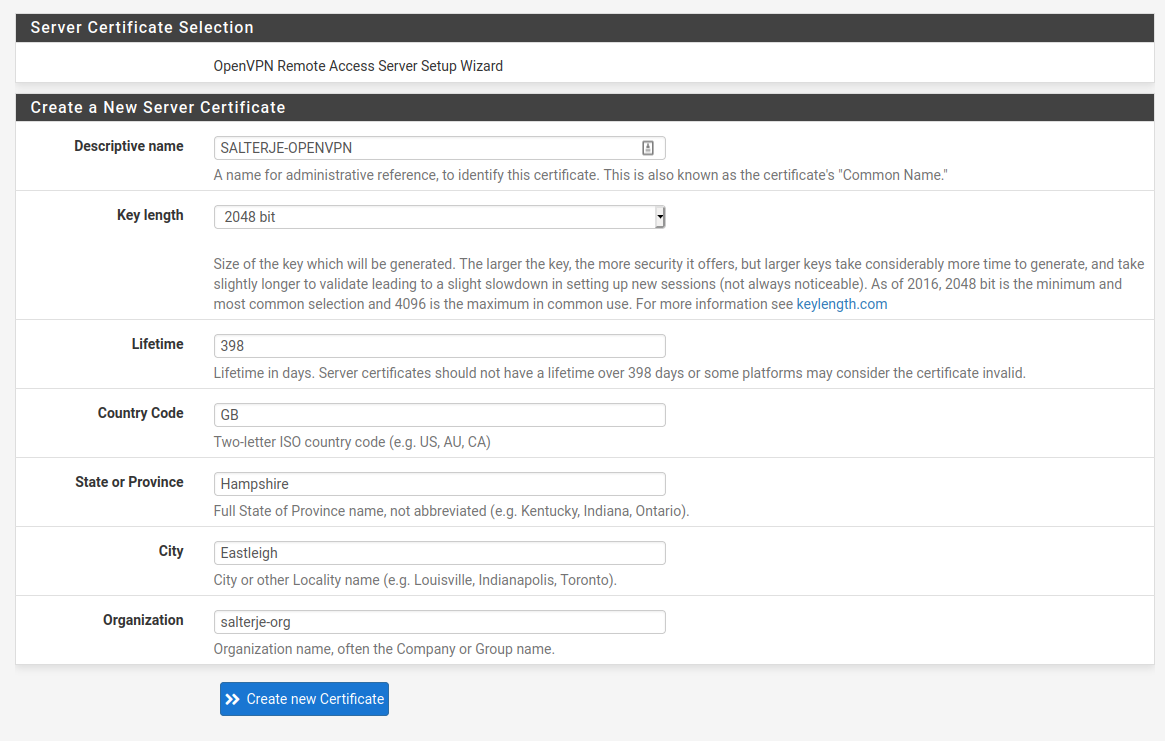
We'll then create a certificate for the Server itself, which will use the CA that has just been created.
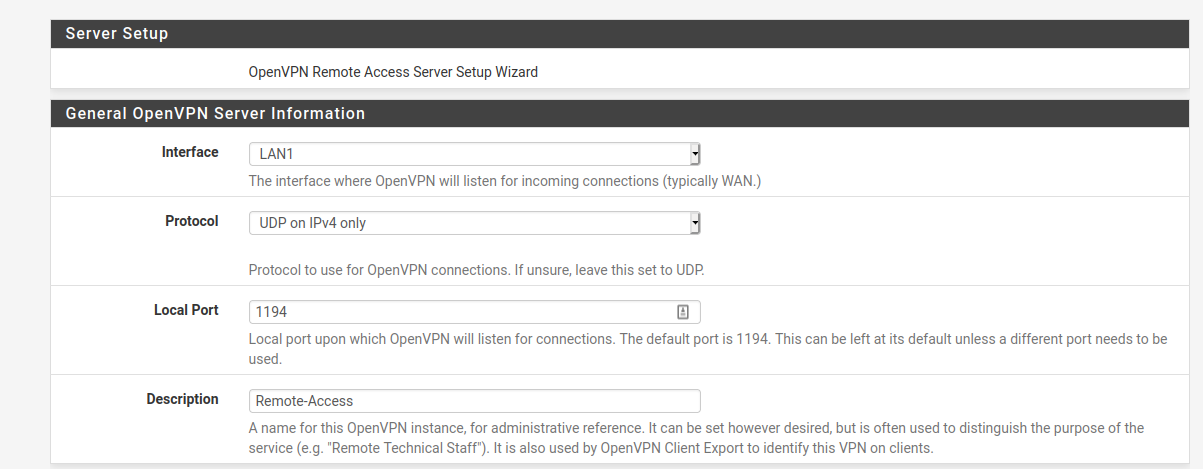
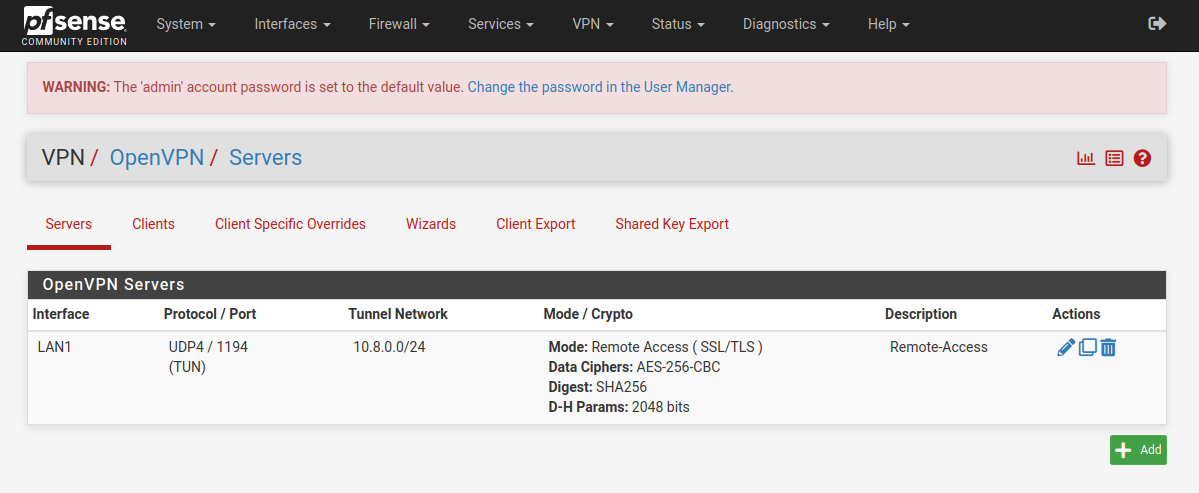
We'll actually be using LAN1 for our VPN which is slightly different to a lot of real installations that will be using the WAN link.
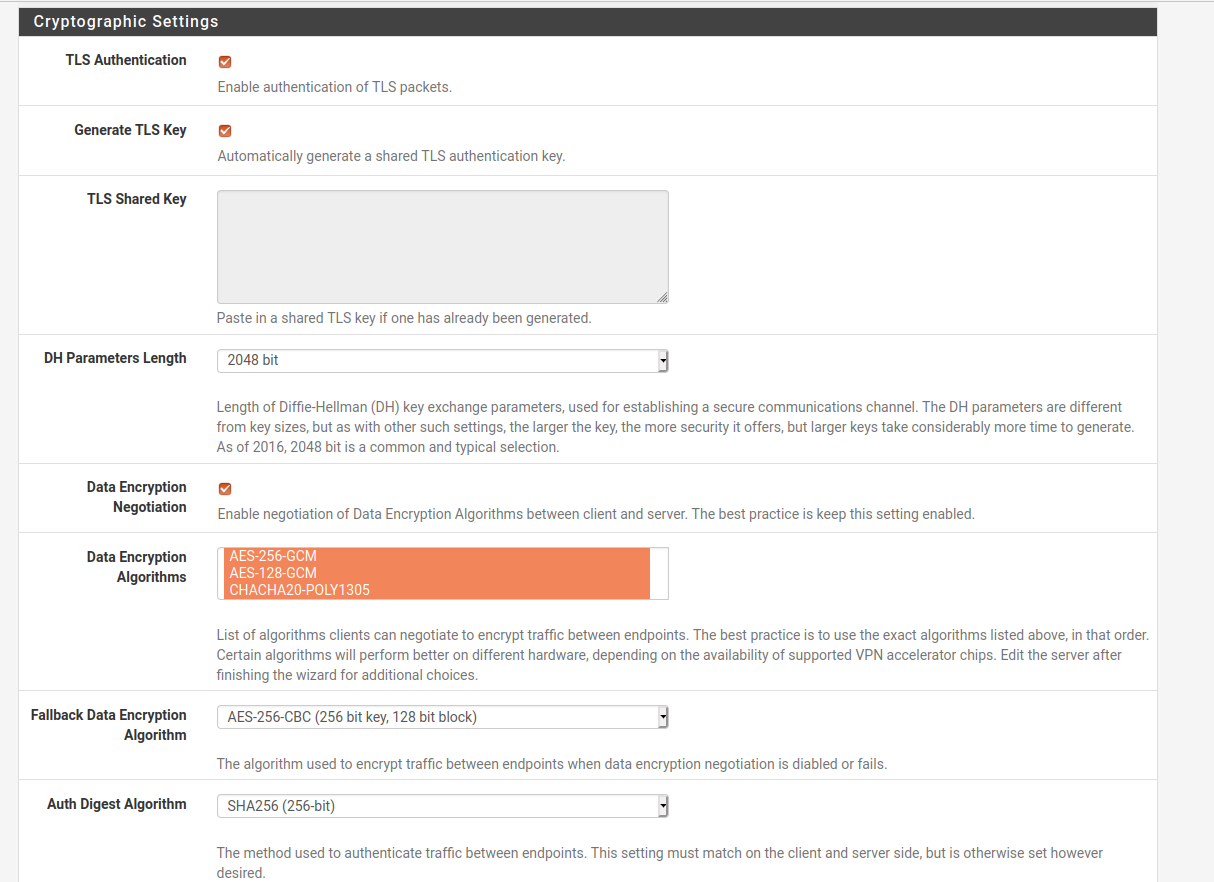
Most of the next settings can be left to default
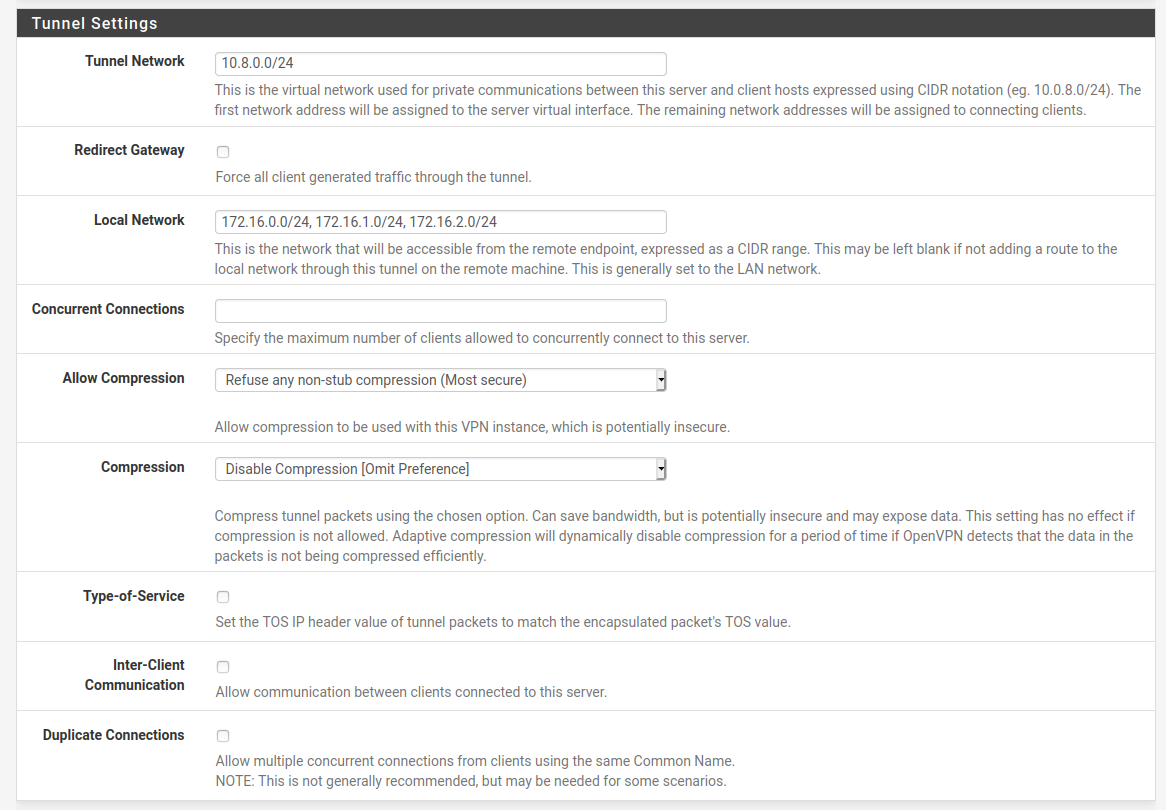
The Tunnel network can be set to any IP range, as long as it's not used anywhere else on the network. This range will be what is assigned to the tunnel network and in our case we'll keep to the standard range of 10.8.0.0/24. This will give us plenty of addresses for any potential clients.
We must also define the networks that will be pushed out to the clients. In our case as well as the 172.16.0.0/24 network that holds our Web Server we'll push out two other networks to prove our configurations.
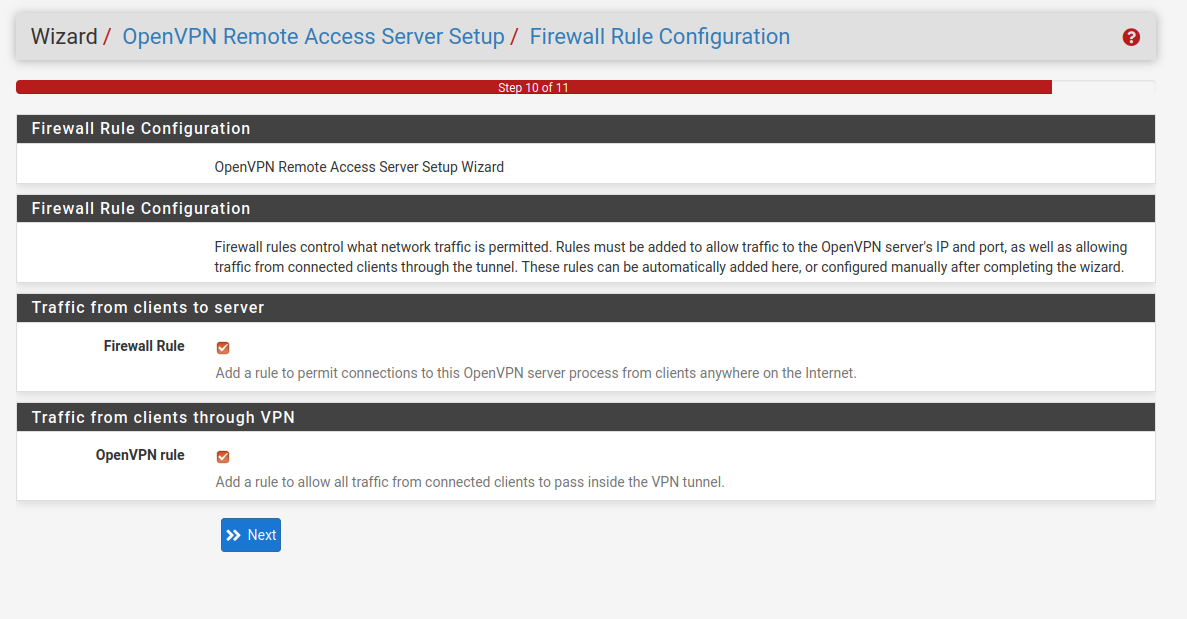
The final stage is the automatic creation of appropriate firewall rules as by default PFSense will block everything on the interfaces. It is necessary to create rules for the LAN1 interface as well as the OpenVPN interface itself.
Modification of the VPN to Use Just TLS
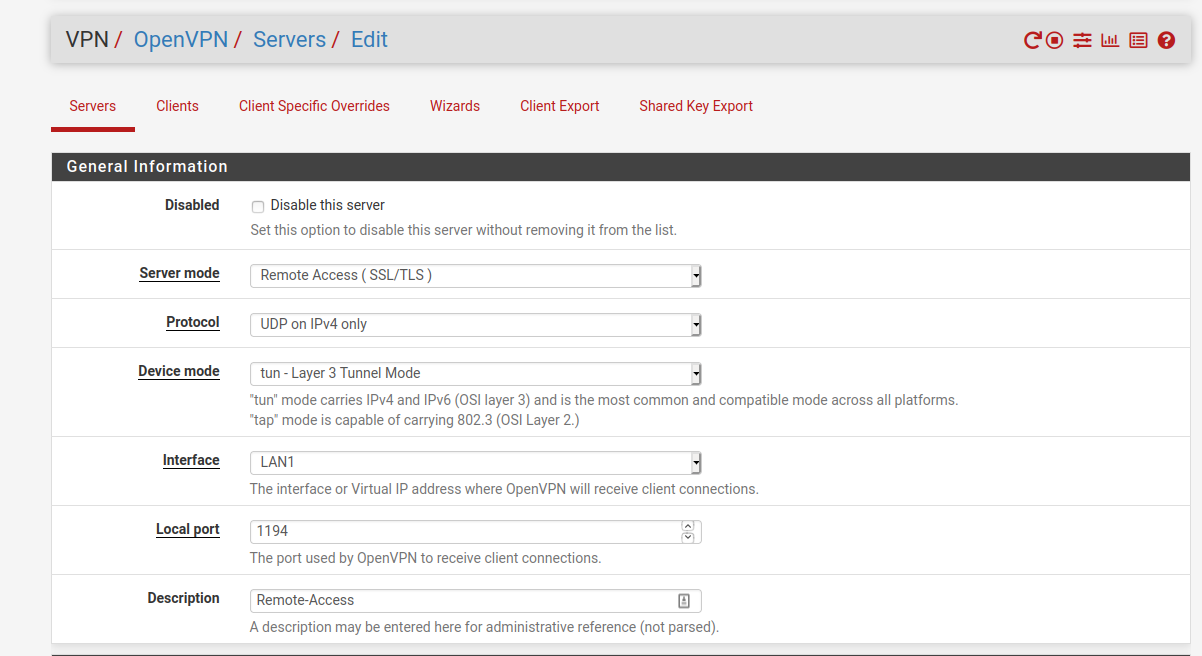
Once the VPN Server has been created by the Wizard we will perform a minor tweak to it to change the authenication mode to just accept TLS/SSL logins rather then also needing a username/password.
This is mostly to ease the configuration of the client1 settings to save having to add the username/password settings.
Creation of Users for the VPN
The final stage is the creation of a couple of users for each of the clients. We'll also create some appropriate certificates for each user which will be signed by our CA.
This is done with the User Manager section of the GUI and we will tick the box to also create a certificate for each user. While we will be setting the VPN server to not need a username/password to be entered we will create them when creating the user.


As can be seen the certificate makes use of the CA that was previously created.
Export of Settings to the Clients
The final stage is to export the appropriate configuration files, certificates and keys to the clients and for this we'll make use of the plugin we previously installed.
The client export section can be found under the client export section of the VPN.
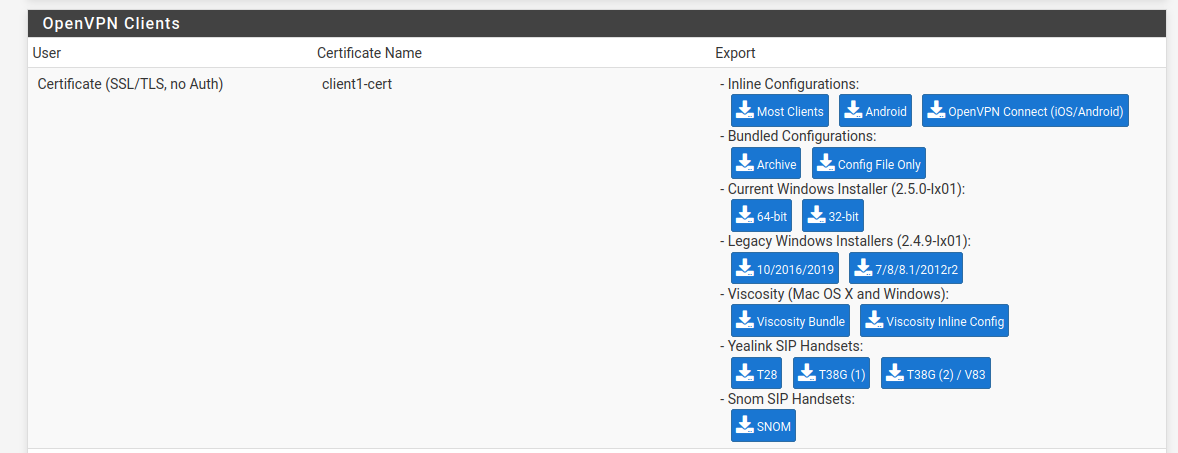
The client export section actually has the relevant files for many different clients, including windows, android and apple. This makes it a really useful tool.
It is a simple task to download the appropriate files, in our case the bundled configurations archive which has everything needed for our Linux clients.
Installation onto the Clients
The exported bundle for each client can be scp'd to the necessary machines and moved to the appropriate directories at /etc/openvpn
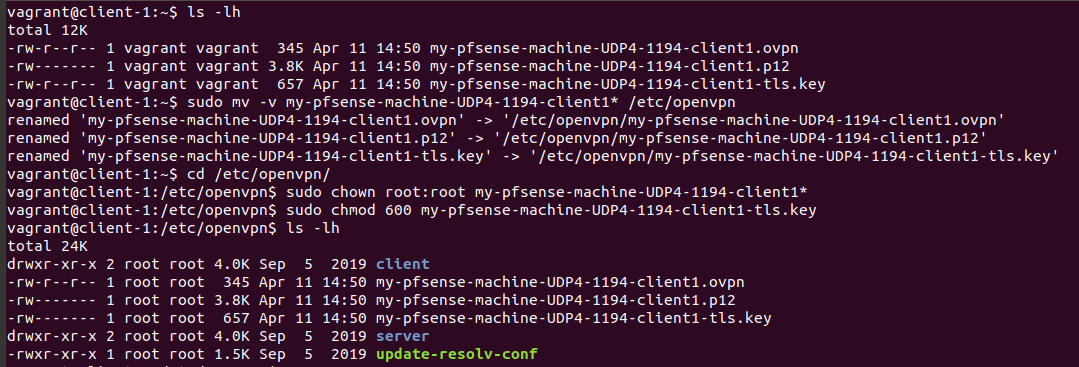
There are also some minor tweaks to the owner of the files and permissions.
The two clients are slightly different as the 2nd client is an Ubuntu 20.04 Desktop which allows the .ovpn file to be imported easily using network control manager.
As per our last Lab we will run the client1 from the commandline to allow testing.

Once both clients are running we can run our tests.
Confirmation of OpenVPN Connections
The initial checks can be done within the GUI running on PFSense which will confirm that both clients are connected.
This can be found under the OpenVPN status page.
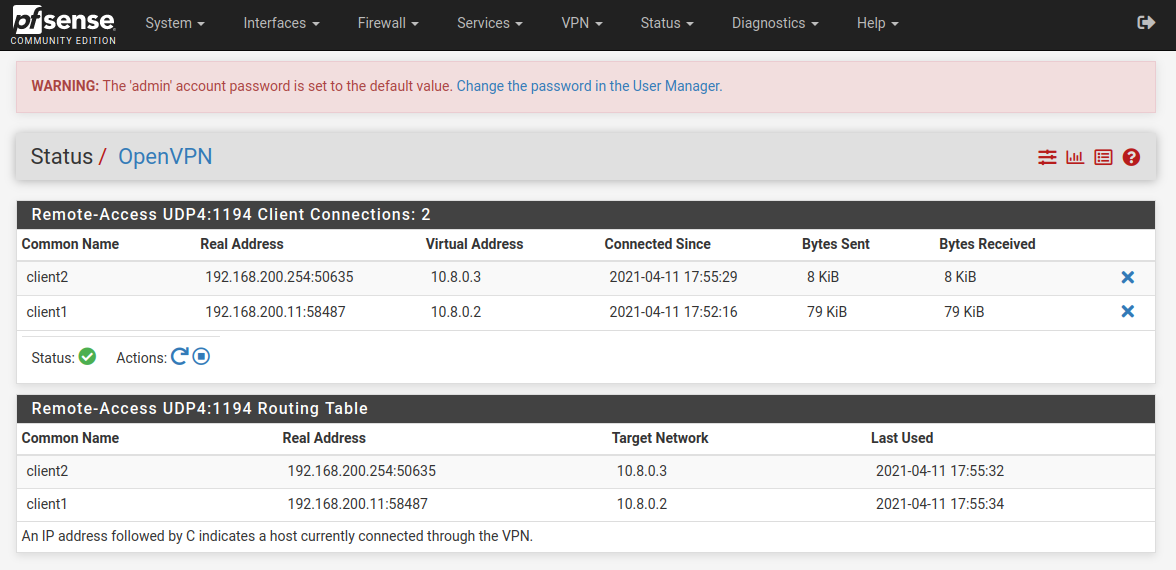
This confirms that the connection has been made but it is also important to check the path that both clients are using to reach 172.16.0.20 which should be over our new tunnels via the 10.8.0.1 address which is the OpenVPN server on our PFSense Machine.
We can also check the routing tables of the clients which should have our new routes pushed to them, including the extra two networks we configured.
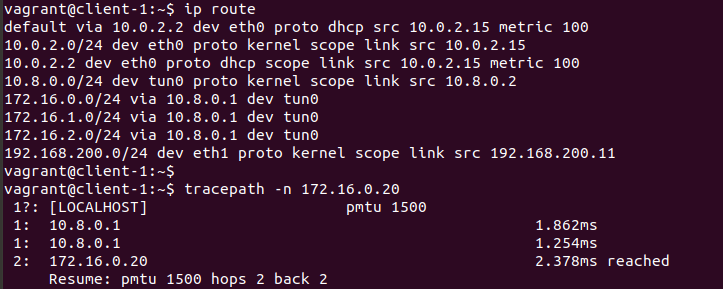
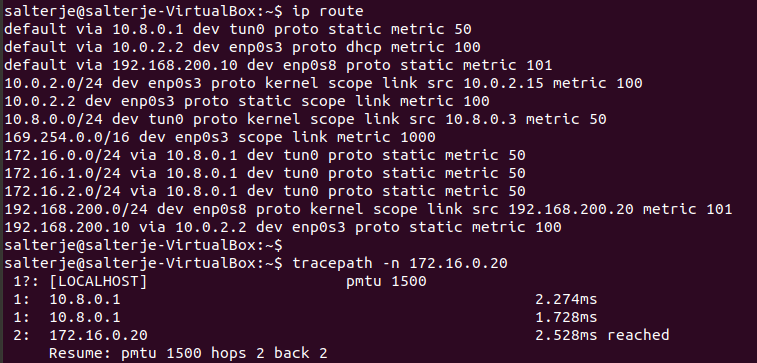
This proves that we have setup OpenVPN and the clients are connecting to the remote network via the PFSense Machine rather then the VirtualBox NAT interface.
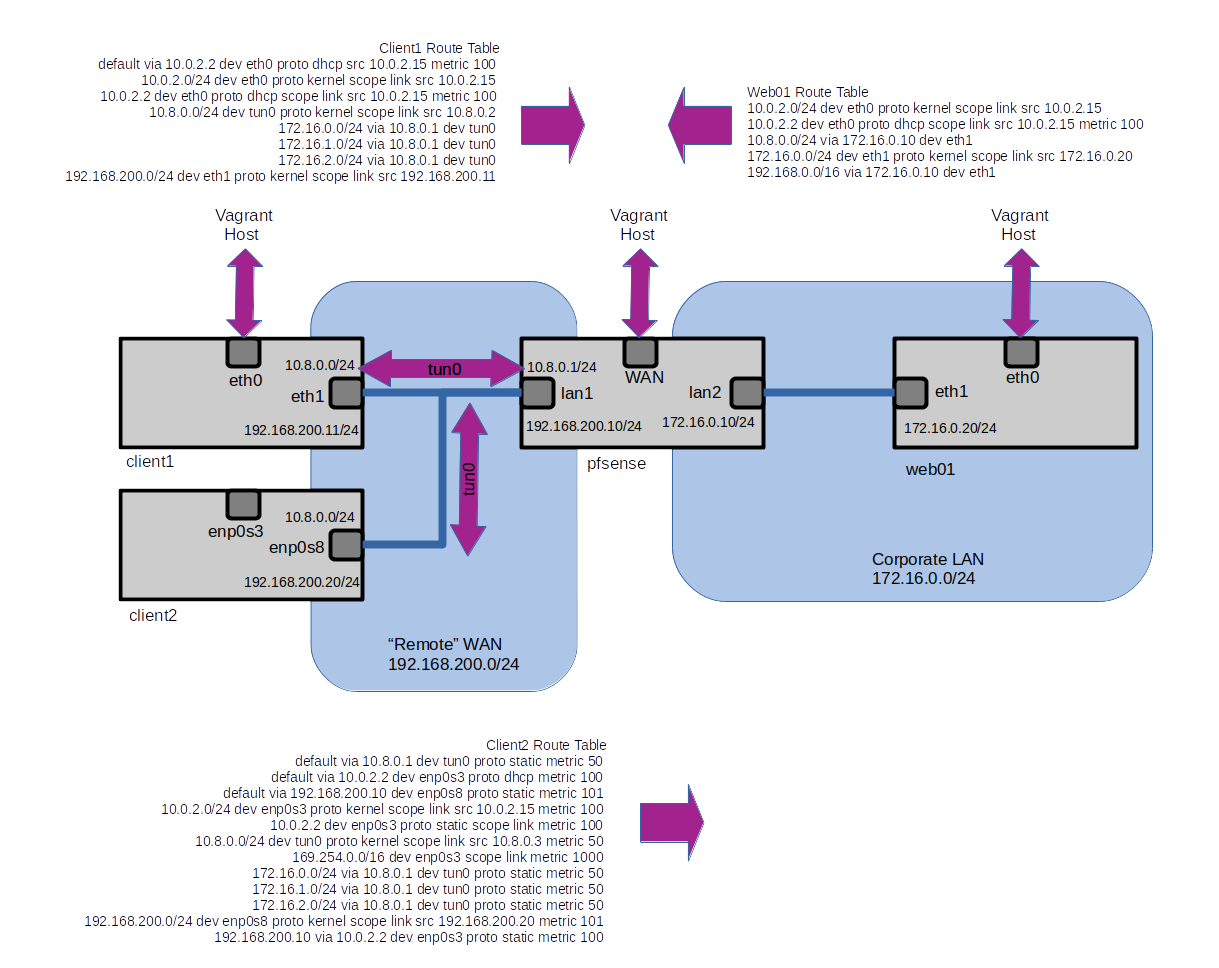
Conclusions
PFSense allows the creation of an OpenVPN Server in as user friendly manner as is possible with the creation of a VPN. It is possible to configure most things via Wizards which also deal with such things as the creation of certificates and the appropriate configuration files.
The Client Export Plugin makes it much easier to allow a wide range of clients to be used. It is possible to make changes to the way the VPN works and regenerate the client files easily.
The final verification of the connections was done by checking that the routing tables of the clients had the new routes added and that the connection to the Web Server was indeed via the Tunnel device rather then the physical interface.