It is always best to have capacity management on any system, particularly when resources are shared. This is particularly important for memory and CPU use as potentially a rogue application can impact other users. Thankfully containerised solutions make use of underlying technology such as kernel cgroups that allow ring-fencing of resources available on the underlying Host.
The two main criteria when allocating resources are the requests that a container makes and it's limits.
The request is used by the scheduler when deciding where to place the POD. This tells the system how much CPU or memory that the application needs to run. If there are no Nodes that have sufficient resources available then the PODs will not be scheduled.
The limit is a value that can be set which will allow an intervention to take place should there be an issue. A POD will be terminated if it should consume more memory then the limit that has been set.
In the case of a burst of CPU the POD could grab some extra CPU if the limit is made larger then the request but it will be limited at some point, rather then killed off.
For predictable behaviour the limit and request value for a container can be made the same. A higher limit will give a bit more headroom should there be occasional peaks in memory or CPU use.
Setting Limit Ranges
By default containers run with unbounded resources and this may be fine if the application is guaranteed not to start grabbing more CPU or memory. However most people responsible for a production system are probably not going to rely on the application not running amok.
This is where setting limits within the manifest file is useful.
We'll start with a simple Deployment but add some settings within the resources section of the YAML.
apiVersion: apps/v1
kind: Deployment
metadata:
  creationTimestamp: null
  labels:
    app: nginx-set-limits
  name: nginx-set-limits
  namespace: default-limits   # Deployed to default-limits namespace
spec:
  replicas: 1
  selector:
    matchLabels:
      app: nginx-set-limits
  strategy: {}
  template:
    metadata:
      creationTimestamp: null
      labels:
        app: nginx-set-limits
    spec:
      containers:
      - image: nginx
        name: nginx
        resources:
          limits:
            memory: "512Mi"   # This will delete the container if it goes over 512Mi of memory
          requests:
            memory: "384Mi"  # This will tell the scheduler to only run the container on a suitable Node
This can be deployed by applying the manifest file.
kubectl apply -f kubectl apply -f nginx-set-limits.yaml
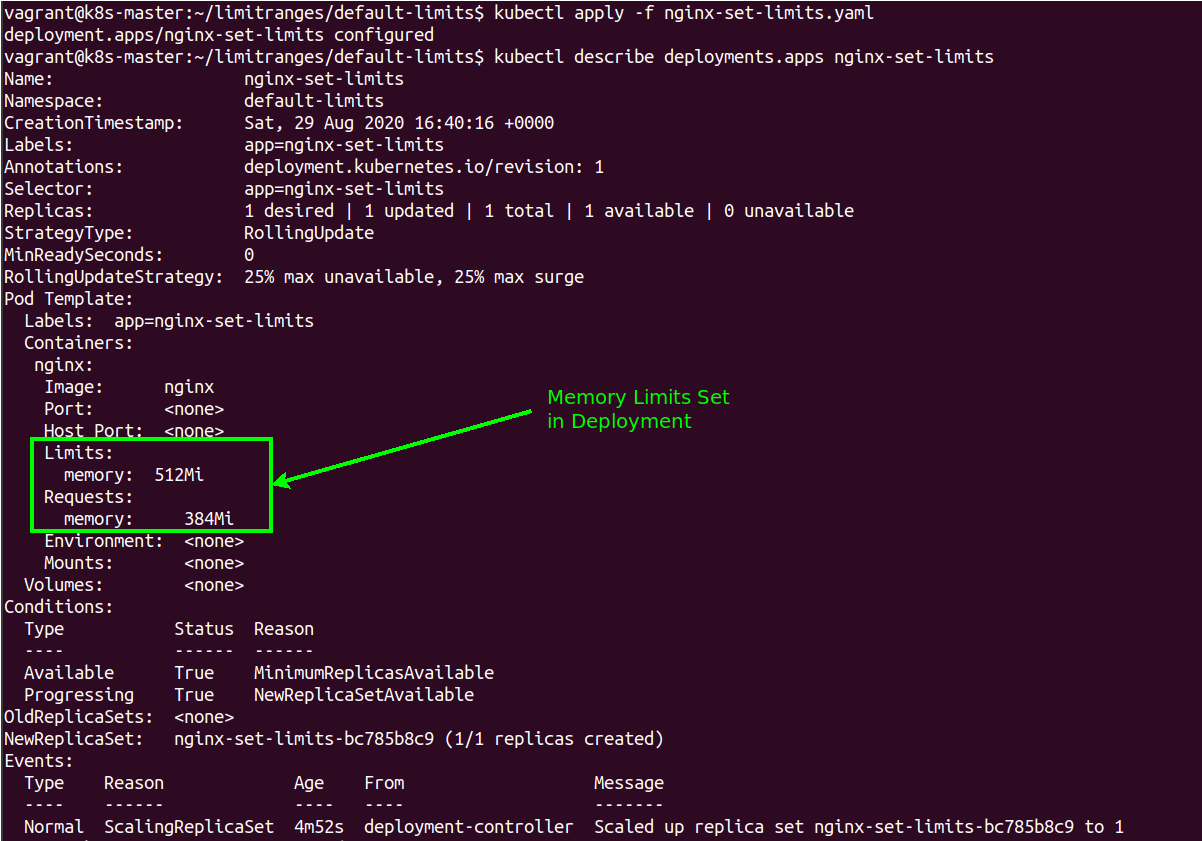
kubectl describe deployment nginx-set-limits

This shows that the containers that have been created as part of the POD within the deployment have had a limitation of memory use as well as a request that the POD will make of the scheduler to ensure that the Node can support the request.
Adding the resource limits and requests within the YAML for each POD is fine but it is also possible to set a default value within a Namespace that will apply set resources to all deployed PODs, even if it is not explicitly stated in the manifest.
Create Default Limits within a Namespace
We'll now create a Limit Range and apply it to the namespace.
apiVersion: v1
kind: LimitRange
metadata:
  labels:
    app: my-nginx
  name: my-limit-range
  namespace: default-limits
spec:
  limits:
  - default:
      memory: 512Mi
    defaultRequest:
      memory: 256Mi
    type: Container
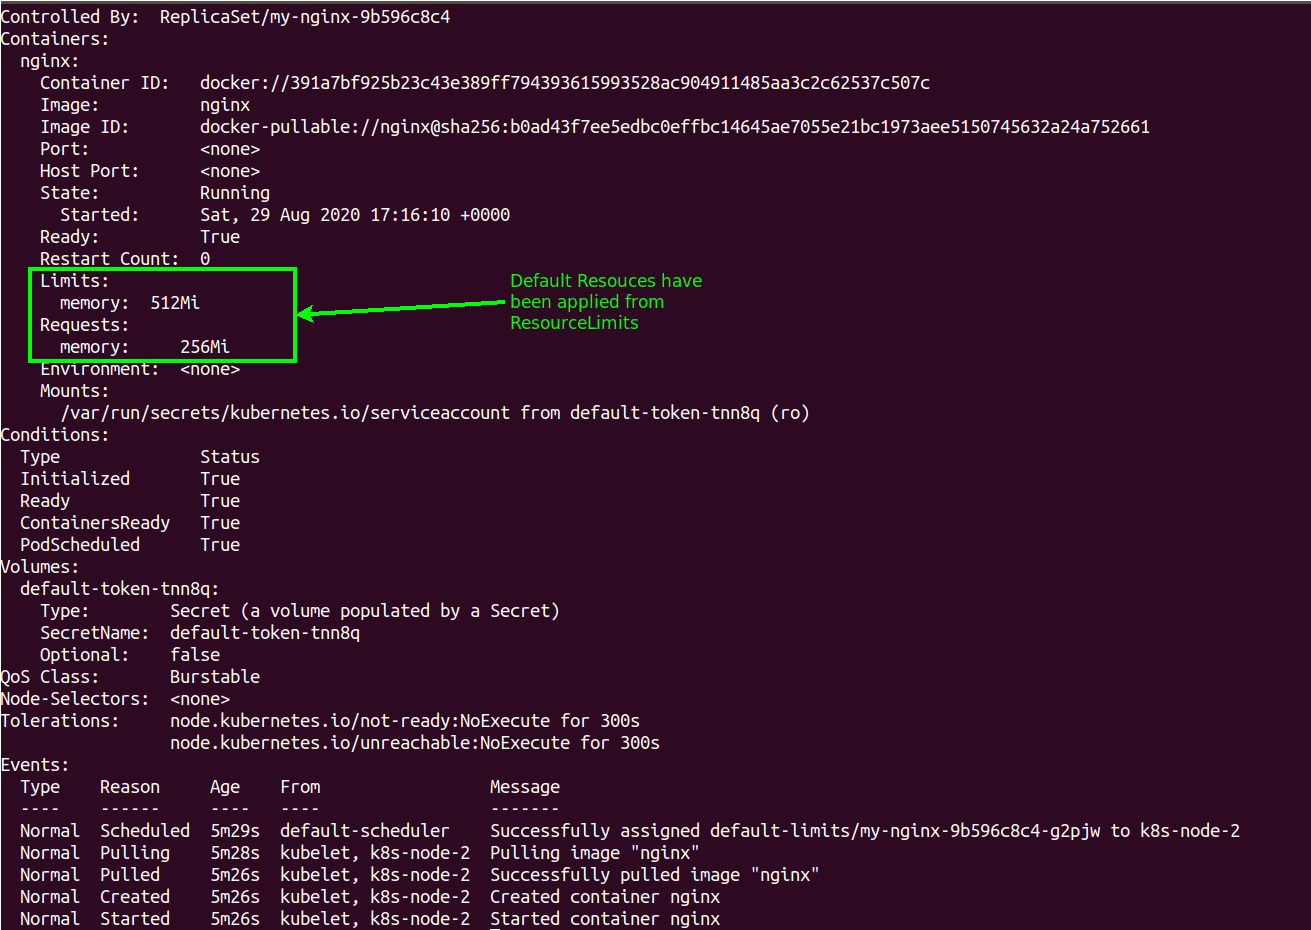
The created LimitRange created will add a default value requesting 256Mi and having a default limit of 512Mi for all future created PODs.
We can test this by creating another deployment without any default resources.
apiVersion: apps/v1
kind: Deployment
metadata:
  creationTimestamp: null
  labels:
    app: my-nginx
  name: my-nginx
spec:
  replicas: 3
  selector:
    matchLabels:
      app: my-nginx
  strategy: {}
  template:
    metadata:
      creationTimestamp: null
      labels:
        app: my-nginx
    spec:
      containers:
      - image: nginx
        name: nginx
        resources: {}
It can be seen that this Deployment will create 3 replicas and we'll apply the --namespace=default-limits to ensure they are created in our namespace which will enforce the default values.
kubectl apply -f my-nginx.yaml --namespace=default-limits
vagrant@k8s-master:~/limitranges/default-limits$ kubectl get pods --namespace=default-limits
NAME                               READY   STATUS    RESTARTS   AGE
my-nginx-9b596c8c4-g2pjw           1/1     Running   0          2m23s
my-nginx-9b596c8c4-kc6s9           1/1     Running   0          2m23s
my-nginx-9b596c8c4-w6cxj           1/1     Running   0          2m23s
nginx-set-limits-bc785b8c9-2hwxj   1/1     Running   0          38m
We can then describe one of the PODs running as part of the my-nginx deployment to confirm the resource values that have been assigned.
kubectl describe pod my-nginx-9b596c8c4-g2pjw

We can also confirm that these values are being applied within the namespace.
vagrant@k8s-master:~/limitranges/default-limits$ kubectl describe namespaces default-limits
Name:         default-limits
Labels:       <none>
Annotations:  Status:  Active

No resource quota.

Resource Limits
 Type       Resource  Min  Max  Default Request  Default Limit  Max Limit/Request Ratio
 ----       --------  ---  ---  ---------------  -------------  -----------------------
 Container  memory    -    -    256Mi            512Mi          -
Setting a Maximum and Minimum Value
As well as setting a default value it is also possible to set a minimum and maximum value that will stop individual containers from consuming too much resource.
The manifest file to create this is very similar to the one that was used to create the default values.
apiVersion: v1
kind: LimitRange
metadata:
  labels:
    app: my-nginx
  name: my-limit-range
  namespace: default-limits
spec:
  limits:
  - default:
      memory: 512Mi
    defaultRequest:
      memory: 256Mi
    max:
      memory: 768Mi
    min:
      memory: 256Mi
    type: Container
Once this is applied to the namespace we can see that the minimum and maximum values for memory use will also be set for all future containers.
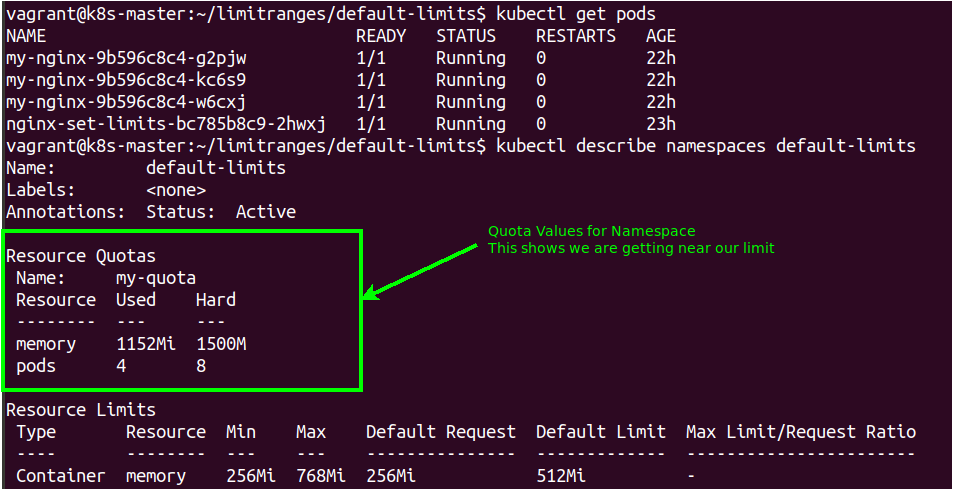
This will prevent any container from going above 768mi and below 256Mi of memory when they are created within the default-limits namespace. This is combined with the default values that will always ensure there is a default request of 256Mi and a default limit of 512Mi if there isn't anything explicitly set within the manifest file.

It is possible to overwrite the default resource limits within a POD manifest but the Resource Limits attached to this namespace will not allow more then 768Mi to be allocated.
Creating a Quota
The next step that can be done to control resources being taken up by the running PODs is the use of a Quota within the Namespace. This allows limits to be placed within a Namespace that will limit such things as CPU, memory and even the number of running PODs.
We'll create the following manifest file and apply it within the Namespace.
apiVersion: v1
kind: ResourceQuota
metadata:
  creationTimestamp: null
  name: my-quota
  namespace: default-limits
spec:
  hard:
    memory: 1500M
    pods: "8"
This gives a simple limit of 1.5G of memory and a maximum of 8 PODs that can be run. There are quite a few other things that can be added to the Quota but for our simple example we will just stick with memory and POD numbers.
Note
If something is added to a Quota there must also be a corresponding value for a container. This is another reason for having default values added as without them the POD would not be scheduled on any Node.
We can then take a look at our Namespace and running PODs which will now show our Quota and how close we are getting to how much we can schedule within this particular Namespace.

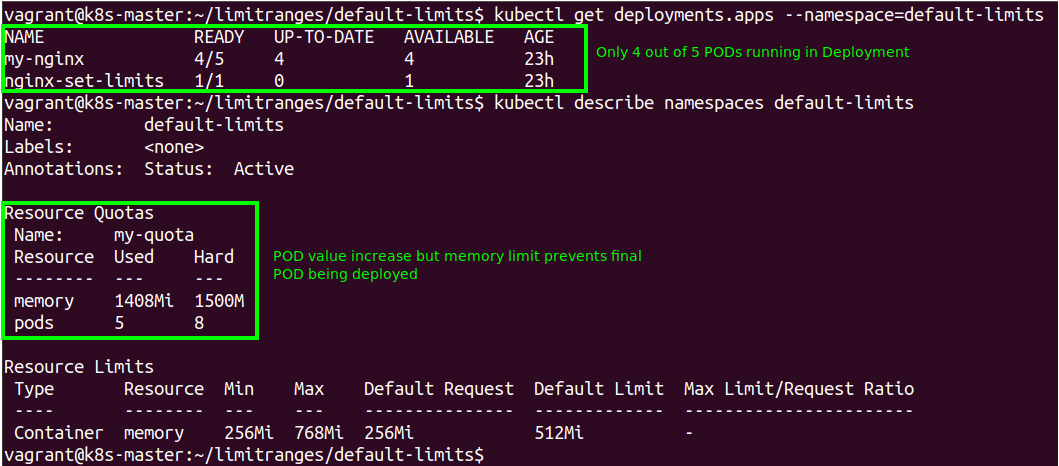
To prove the Quota is operational we will scale the my-nginx deployment up from 3 PODs up to 5. This is easily done on the fly by scaling the Deployment:
kubectl scale deployment my-nginx --replicas=5 --record

However when we check the Deployment we see that only 4 PODs have been deployed. We can also see that the Quota shows the number of PODs is still within our range but we would go over the memory Quota if the final POD was deployed (it has a request value of 256Mi).
To allow the POD to be run the Quota would need to be changed or something would have to be deleted to give the memory allocation.
Note
The Resource Limits that have been set dictate the actual memory that would be used so it would be possible for the memory used on the Node to peak above these values. To prevent this the limit and request values can be made the same which gives more predictable behaviour.
Conclusions
The use of Resource Limits gives control of how much compute resource will be used in the cluster by containers. It is very possible to explicitly configure these values for all containers and this should be done based on what the application is designed for.
It is best to set a default value that will be used in case a Deployment is created that hasn't been configured. This will ensure that a mis-configuration does not cause a container to grab all the resources on a Node (particularly in a fault scenario). This will ensure that all PODs created within the Namespace will have a sensible amount of resources allocated, neither too big or too small.
The use of Resource Limits can also be combined with a Quota within the Namespace. This is what gives protection against Deployments being made on a Node that will grab too much resource.
Of course the Quota is applied over a Namespace which will deploy the PODs over multiple Nodes. The use of Quotas, Resource Limits and Namespaces gives a means of ensuring that compute resources can be controlled and helps to prevent overloading of the Cluster. As per any system design careful capacity planning must be made to ensure that resources are not made use of without being managed.