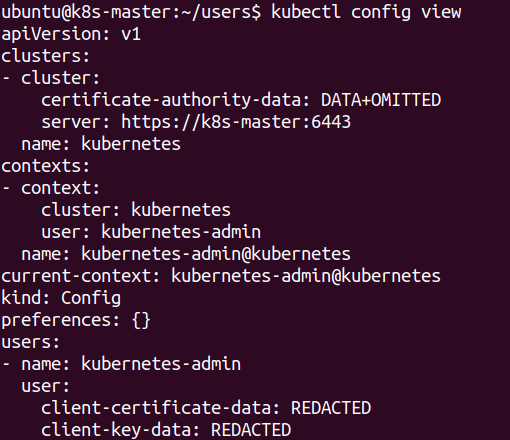
The user that kubeadm creates when building a cluster has full access, allowing the creation and deletion of anything within the cluster.
In this post we will create a new user, salterje, which only has the ability to gather information about running Pods running within the default namespace of the cluster.
In order to do this a private key is generated which is used to generate a certificate signing request using the cluster Certificate Authority. This allows a suitable certificate to be generated for our new user.
We must then modify the default kubeconfig file to add the user's credentials along with a suitable context that will be used in place of the default kubernetes admin context.
The final step is the creation of a suitable role that only allows the viewing of Pods and for this we will create a role binding object linking the role to the newly created salterje user.
Creation of New User
The user that is to be created must first have a private key generated.
Creation of Private Key for User
openssl genrsa -out salterje.key 2048

Create a Certificate Signing Request
The next stage is to create a Certificate Signing Request using the Kubernetes CA and the newly generated private key.
openssl req -new -key salterje.key -out salterje.csr -subj "/CN=salterje/O=projects"

Use the Cluster CA and CA.key to Sign CSR
The generated CSR can now be signed by the cluster CA certificate and CA.key

Add User to Kubeconfig
The signed certificate and private key for the new user can now be added to the kubeconfig file allowing access to the cluster. For this a new context and user will be added.
The easiest way of doing this is to use kubectl to modify the kubeconfig file.
The initial kubeconfig file that has been created by kubeadm has a kubenetes-admin user with full access.

We will initially add the credentials for the new salterje user, making use of the signed certificate and private key. A cluster entry will also be added as well as a suitable context to link both together.
kubectl config set-credentials salterje --client-certificate=salterje.crt
--client-key=salterje.key --embed-certs
kubectl config set-cluster salterje-cluster --server=https://k8s-master
--certificate-authority=/etc/kubernetes/pki/ca.crt --embed-certs
kubectl config set-context salterje-login --user=salterje
--cluster=salterje-cluster
These three commands will add a new user, cluster and context to the default kubeconfig file within the cluster
apiVersion: v1
clusters:
- cluster:
    certificate-authority-data: DATA+OMITTED
    server: https://k8s-master:6443
  name: kubernetes
- cluster:
    certificate-authority-data: DATA+OMITTED
    server: https://k8s-master:6443
  name: salterje-cluster
contexts:
- context:
    cluster: kubernetes
    user: kubernetes-admin
  name: kubernetes-admin@kubernetes
- context:
    cluster: salterje-cluster
    user: salterje
  name: salterje-login
current-context: kubernetes-admin@kubernetes
kind: Config
preferences: {}
users:
- name: kubernetes-admin
  user:
    client-certificate-data: REDACTED
    client-key-data: REDACTED
- name: salterje
  user:
    client-certificate-data: REDACTED
    client-key-data: REDACTED
Once these have have been set we can make use of the new salterje-login context
kubectl config use-context salterje-login
To prove the functionality we try getting the running Pods within the cluster

This proves the new user doesn't have any rights to access anything within the cluster at the moment.
The next stage is to create a role and rolebinding object to link the newly created user.
Create a Role
We create a role that allows the listing and watching of Pods but doesn't allow the creation of them (or viewing any other objects).
kubectl create role pod-reader --verb=get --verb=list --verb=watch
--resource=pods --dry-run=client -o yaml > pod-reader.yaml
This creates the pod-reader.yaml manifest
apiVersion: rbac.authorization.k8s.io/v1
kind: Role
metadata:
  creationTimestamp: null
  name: pod-reader
rules:
- apiGroups:
  - ""
  resources:
  - pods
  verbs:
  - get
  - list
  - watch
We also need to create a suitable role-binding to link the role to our new user. This generates the pod-reader-binding.yaml manifest.
kubectl create rolebinding pod-reader-binding --user=salterje --role=pod-reader
--dry-run=client -o yaml > pod-reader-binding.yaml
apiVersion: rbac.authorization.k8s.io/v1
kind: RoleBinding
metadata:
  creationTimestamp: null
  name: pod-reader-binding
roleRef:
  apiGroup: rbac.authorization.k8s.io
  kind: Role
  name: pod-reader
subjects:
- apiGroup: rbac.authorization.k8s.io
  kind: User
  name: salterje
In essence the role-binding object links the user to the role that has been created.
In order to create the objects the manifests are run in the normal way, but we must first go back to the kubernetes-admin context to run the commands.
kubectl config use-context kubernetes-admin@kubernetes
kubectl create -f pod-reader.yaml
kubectl create -f pod-reader-binding.yaml
Now going back to the salterje-login context it can be proven that we are able to view Pods but not view services or do anything else within the cluster.
kubectl config use-context salterje-login

Conclusions
The use of RBAC within Kubernetes allows the linking of users with roles within the cluster. This allows minimum privalege levels for a user and the associated role.
However Kubernetes doesn't have a concept of a user object and relies on the use of certicates and keys that are sent with the api call. This lab has shown how to create the necessary key and certificate as well as the modification of the kubeconfig file to create a new context to use them.
Once the incoming request has been authenicated the request is authorized against a role which must be linked to a user with a suitable role-binding object.