This post examines making use of the netcat utility to confirm connectivity between containers running within a Kubernetes cluster. Netcat is a really useful tool for testing network connectivity which is part of the standard Busybox image.
The tool can be used for setting up a basic server listening on a particular port as well as a client connecting to a port running on a different container.
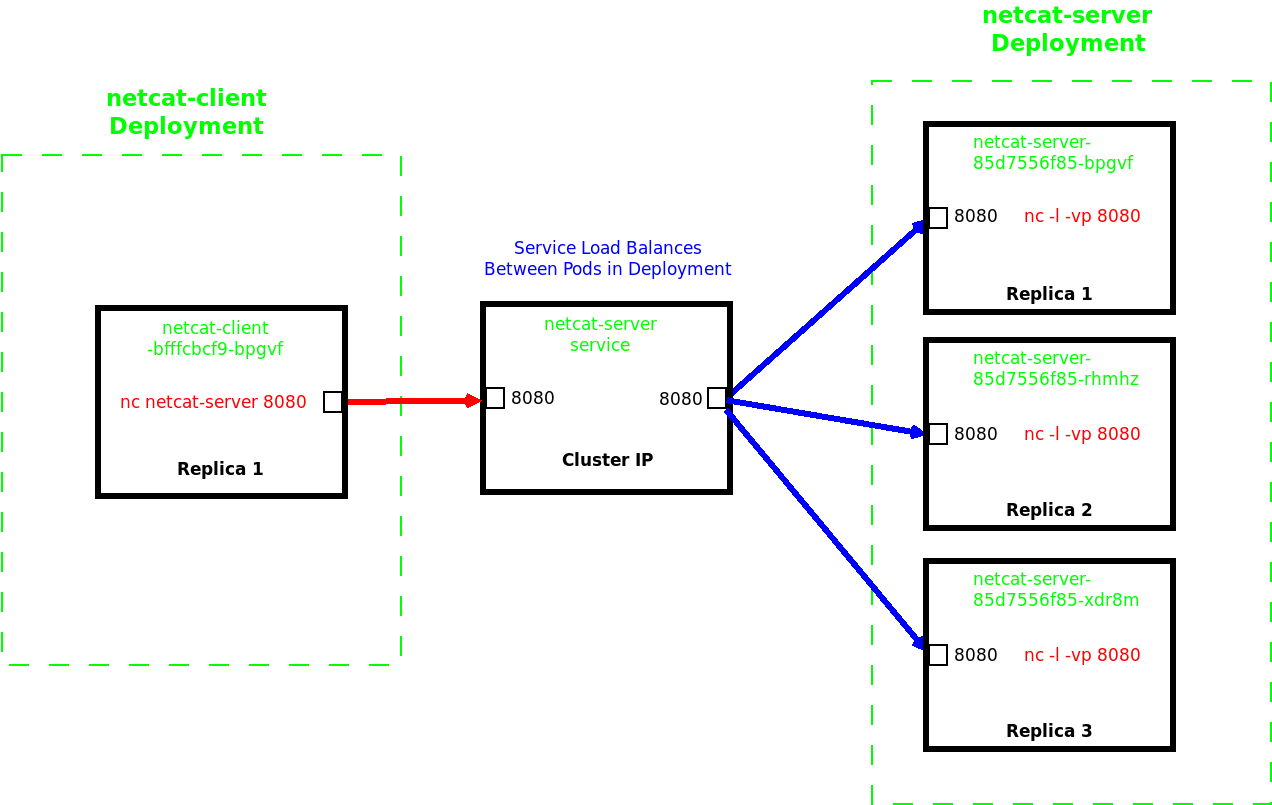
We'll create some Busybox Deployments, linked with a suitable service and create a simple TCP server to listen on a particular port. This will allow us to confirm connectivity from another Pod acting as a client via the connected service.
Netcat TCP Server
A simple Deployment is created using the following manifest.
apiVersion: apps/v1
kind: Deployment
metadata:
  creationTimestamp: null
  labels:
    app: netcat-server
  name: netcat-server
spec:
  replicas: 1
  selector:
    matchLabels:
      app: netcat-server
  strategy: {}
  template:
    metadata:
      creationTimestamp: null
      labels:
        app: netcat-server
        networking/allow-connection-netcat-client: "true"
    spec:
      containers:
      - image: busybox:1.28
        name: busybox
        command: ["sh","-c"]
        args:
        - echo "Beginning Test at $(date)";
          echo "Stating Netcat Server";
          while true; do { echo -e "HTTP/1.1 200 OK\r\n"; echo "This is some text sent at $(date) by $(hostname)"; } | nc -l -vp 8080; done
The simple shell script causes netcat to listen on port 8080, has verbose logging and will return a simple html response which will send back some text with the current date and display the hostname.
We'll create another Deployment to act as a simple client to connect to our server.
apiVersion: apps/v1
kind: Deployment
metadata:
  creationTimestamp: null
  labels:
    app: netcat-client
  name: netcat-client
spec:
  replicas: 1
  selector:
    matchLabels:
      app: netcat-client
  strategy: {}
  template:
    metadata:
      creationTimestamp: null
      labels:
        app: netcat-client
        networking/allow-connection-netcat-client: "true"
    spec:
      containers:
      - image: busybox:1.28
        name: busybox
        command: ["sh","-c"]
        args:
        - echo "Beginning Test at $(date)";
          sleep 3600
The two Deployments can be created by running the manifests
kubectl create -f netcat-server.yaml
kubectl create -f netcat-client.yaml
We'll also expose the netcat-server deployment to create a clusterIP service that will give us an easy way of connecting to it.
kubectl expose deployment netcat-server --port=8080
This has created our basic test setup and we'll also scale up the number of servers that we have running.
kubectl scale deployment netcat-server --replicas=3 --record
To confirm what is running
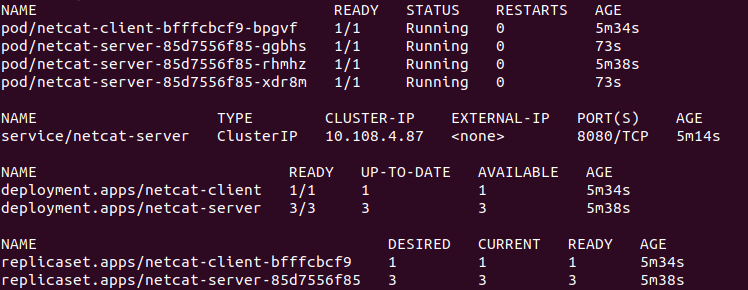
kubectl get all
This will show that we have 3 replicas of the netcat-server deployment.


Proving Connectivity
To test the connectivity we will run an interactive shell on the busybox-client Pod and connect to the netcat-server deployment on port 8080 via the netcat-server service, which will load-balance between the endpoint Pods.
kubectl exec -it netcat-client-bfffcbcf9-bpgvf -- sh
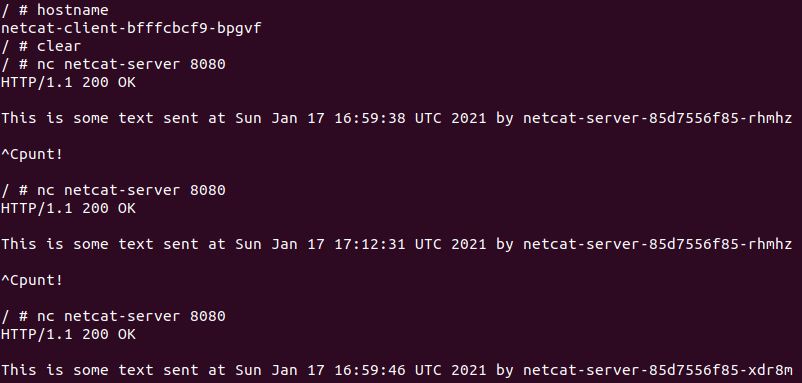
We can use the same netcat command to connect to the service proving that the netcat running on the remote Pods is returning our simple message.
# nc netcat-server 8080

To send the command from the client again it is necessary to escape using CTRL-C each time to send another request.
It can be seen that the messages being returned are actually coming from multiple containers, running on different Pods that form the netcat-server Deployment.
Conclusions
Netcat can be used to allow a simple server to be created within a container to listen upon a set port. In this example the server is returning a simple message with the hostname and date, allowing us to confirm that the associated service is indeed load balancing between the end Pods.
Netcat can also be used as a client to get the returned information from the server, which we have done from another Busybox container.
In this lab we run a small script to bring the server up upon creation of the container within the Pod. Upon creation the script returns the hostname and date to anything connecting to the Pod on port 8080.
It is also very possible to create basic Busybox containers that can be used ad-hoc via interactive shells, giving a good way of troubleshooting connectivity issues within the cluster.